
Полезные статьи от ITComplex
Инструкция по заправке HP Color LaserJet 2700, 3000, 3600n, 3600dn, 3800n, 3800dn, CP3505n, CP3505dn
Мануал по заправке картриджа hp color laserjet 3600n, 3600dn, 3800n, 3800dn, cp3505n, cp3505dn, как заправить картридж q6470a, q6471a, q6472a, q6473a
Предлагаем Вам информацию о заправке HP CLJ 2700, 3000, 3600 n, 3600 dn, 3800 n, 3800 dn, CP3505 n, CP3505 dn, мануал для самостоятельной заправки Q6470A, Q6471A, Q6472A, Q6473A принтера HP
Эта Мануал актуальная для следующих принтеров:
- Color LaserJet-3505 / 3800
- LaserJet-3505 / 3600 / 3800
- LaserJet-2700 / 3000
- Color LaserJet-3600
Инструкции по заправке лазерных картриджей:
Для заправки вам понадобится:
— совместимый тонер;
— плоская отвертка;
— остроконечные щипцы (пинцет).

Начните с удаления запаянных остатков вокруг шпильки с шестереночной стороны картриджа.

Повторите ту же процедуру на стороне без шестеренок.

Просверлите небольшое отверстие над шпилькой на обеих сторонах картриджа.
Вставьте разметчик или выталкиватель шпильки через отверстие, чтобы вытолкнуть шпильку наружу с одной стороны.

Извлеките шпильку при помощи маленьких плоскогубцев. Эта шпилька короткая и подходит только к этой стороне.


Повторите ту же процедуру с противоположной стороны. Эта шпилька также проходит через центр главной ведущей шестеренки во время извлечения.

Запомните размеры шпилек для контактной стороны (короткая) и для стороны шестеренок (длинная).

При помощи инструмента с загнутым краем освободите пружину из барабана со стороны шестеренки.

Освободите пружину со стороны без шестеренок.

Отделите отсек для тонера от барабана.


Начнем с удаления пластины со стороны шестеренки. Конец пластины крепится тремя защелкивающимися изнутри петлями.

Найдите первую петлю на верху пластины. Используя инструмент с загибом, нажмите на петлю.

Найдите вторую петлю и повторите ту же самую процедуру.

С третьей петлей сделайте то же самое.


Снимите шестеренки с проявителя, как показано.

Используя инструмент с загибом, выдвиньте пластину. Покажутся три шестеренки расположенные ниже.

Оставшиеся шестеренки удалены. Показана пластина поддерживающая шестеренку.

Открутите два болта с пластины.

Выдвиньте опору шестеренки, как показано.

На противоположной стороне отсека открутите два болта с пластины.


Теперь вы можете снять ролик проявителя.

Для начала открутите два болта крепящих дозирующее лезвие.

При помощи маленькой плоской отвертки подденьте лезвие, чтобы отделить его от ОЕМ клея.
Внимание: Приподнимайте только с одной стороны.

Как только вы отделили лезвие достаточно далеко от отсека, продолжайте полностью вытаскивать его, используя вашу руку.

Показан отсек:
а) Тщательно очистите отсек при помощи сжатого воздуха.
б) Заполните отсек новым тонером через показанное отверстие.
в) Очистите и установите дозирующее лезвие, чтобы уплотнить тонер.
г) Соберите остальную часть отсека, последовательно, в обратном порядке и отложите его в сторону.

При помощи молотка и стамески выбейте шпильку с другой стороны барабана.

Поверните фото барабан так, чтобы шпилька была видна и доступна для захвата среднего размера плоскогубцами. Вытащите шпильку.


С противоположной стороны барабана стучите по оси барабана внутрь при помощи стамески и барабана, пока ось не выйдет наружу.


Снимите фото барабан, как показано.

Освободите ручку ВПЗ, приподняв ее вверх.

После освобождения обеих ручек, снимите ВПЗ.

При помощи резца аккуратно приподнимите и удерживайте контактную полосу фото барабана, чтобы открутить болт под ней крепящий ракель. Повторите ту же процедуру с противоположного конца лезвия.

Поместите резец или небольшую отвертку между основой ракеля и отсеком снизу, где крепится.

Подденьте ракель и освободите его от клейкого уплотнения.

Теперь медленно, но верно потяните за освободившийся конец ракеля вверх рукой, как показано, пока он полностью не выйдет.

Найдите чип возле задней верхушки картриджа.

Закройте ОЕМ чип.

Используя маленький скальпель, аккуратно срежьте запаянные пластиковые петли крепящие чип.

При помощи кончика скальпеля приподнимайте чип вверх из слота, пока он полностью не выйдет.

ОЕМ чип извлечен.

Нанесите немного пластикового раствора в слоты. Это укрепит замененный чип на месте с каждой стороны.
Внимание: Не наносите слишком много раствора, т.к. он может закрыть контакты чипа, что сделает чип бесполезным.

Вставьте замененный чип так, как показано (золотой пластиной наружу, тремя отверстиями вниз). Чип не будет читаться, если перевернут или вставлен неправильно.

Чип установлен. Дайте раствору высохнуть перед тестированием картриджа.
HP Color LaserJet 2700
 Here you can download drivers for HP Color LaserJet 2700 for Windows 10, Windows 8/8.1, Windows 7, Windows Vista, Windows XP and others. Please, choose appropriate driver for your version and type of operating system. All drivers were scanned with antivirus program for your safety.
Fix Device Driver Error Codes:
If you receive one of the following errors with your HP Color LaserJet 2700 in Windows 10, Windows 8 or Widnows 7:
- Windows has stopped this device because it has reported problems. (Code 43)
- This device cannot start. Try upgrading the device drivers for this device. (Code 10)
- The drivers for this device are not installed. (Code 28)
- Windows cannot load the device driver for this hardware. The driver may be corrupted or missing. (Code 39)
- This device is not working properly because Windows cannot load the drivers required for this device. (Code 31)
- Windows cannot initialize the device driver for this hardware. (Code 37)
- This device is disabled. (Code 29)
This means, that appropriate driver for HP Color LaserJet 2700 is not installed or corrupted. This can be easily fixed by using driver update tool or by updating drivers manually. Download appropriate driver for HP Color LaserJet 2700 for your operating system from our website.
Driver name: PostScript Print Driver Package
Driver version: 60.061.43.00
Release date: 21 Sep 2006
Supported OS: Windows XP, Windows 2000, Windows Server 2003
Driver name: PCL6 Monochrome Plug and Play Package
Driver version: 60.061.447.00
Release date: 21 Sep 2006
Supported OS: Windows XP, Windows 2000, Windows Server 2003
Driver name: PCL6 Monochrome Print Driver Package
Driver version: 60.061.447.00
Release date: 21 Sep 2006
Supported OS: Windows XP, Windows 2000, Windows Server 2003
Driver name: PCL6 Plug and Play Package
Driver version: 60.061.447.00
Release date: 21 Sep 2006
Supported OS: Windows XP, Windows 2000, Windows Server 2003
Driver name: PCL6 Print Driver Package
Driver version: 60.061.447.00
Release date: 21 Sep 2006
Supported OS: Windows XP, Windows 2000, Windows Server 2003
Driver name: PostScript Plug and Play Package
Driver version: 60.061.43.00
Release date: 21 Sep 2006
Supported OS: Windows XP, Windows 2000, Windows Server 2003
Driver name: Unix Modelscripts
Driver version: net_clj2700.sh.Z
Release date: 17 Nov 2011
Supported OS: SCO, Unixware, Caldera OpenUNIX 8, HP-UX, IBM AIX, IRIX, OpenVMS, Sun, Tru64 UNIX
Driver name: Plug and Play Package
Driver version: 60.063.461.42
Release date: 15 Mar 2007
Supported OS: Windows Vista
Driver name: Plug and Play Package
Driver version: 60.063.461.42
Release date: 15 Mar 2007
Supported OS: Windows Vista
Driver version: 2.0
Release date: 15 Apr 2008
Supported OS: Windows Vista, Windows XP, Windows 2000
Driver version: 2.0
Release date: 15 Apr 2008
Supported OS: Windows Vista, Windows XP, Windows 2000
Driver version: 2.0
Release date: 15 Apr 2008
Supported OS: Windows Vista, Windows XP, Windows 2000
Driver name: Universal Print Driver
Driver version: 6.0.0.18849
Release date: 11 Dec 2014
Supported OS: Windows 8.1 64-bit, Windows 8 64-bit, Windows 7 64-bit, Windows Vista 64-bit, Windows XP 64-bit, Windows Server 2012, Windows Server 2008, Windows Server 2008 64-bit
Driver name: Universal Print Driver
Driver version: 6.0.0.18849
Release date: 11 Dec 2014
Supported OS: Windows 8.1, Windows 8, Windows 7, Windows Vista, Windows XP, Windows Server 2008
Driver name: Universal Print Driver
Driver version: 6.0.0.18849
Release date: 11 Dec 2014
Supported OS: Windows 8.1 64-bit, Windows 8 64-bit, Windows 7 64-bit, Windows Vista 64-bit, Windows XP 64-bit, Windows Server 2012, Windows Server 2008, Windows Server 2008 64-bit
Driver name: Universal Print Driver
Driver version: 6.0.0.18849
Release date: 11 Dec 2014
Supported OS: Windows 8.1, Windows 8, Windows 7, Windows Vista, Windows XP, Windows Server 2008
Driver name: Printer Administrator Resource Kit
Driver version: 1.7.8
Release date: 11 Dec 2014
Supported OS: Windows 8.1, Windows 8.1 64-bit, Windows 8, Windows 8 64-bit, Windows 7, Windows 7 64-bit, Windows Vista, Windows Vista 64-bit, Windows XP, Windows XP 64-bit, Windows Server 2012, Windows Server 2008, Windows Server 2008 64-bit
Driver name: Color LaserJet 2700 PCL6MONO Print Driver Only Package
Driver version: 60.063.461.42
Release date: 07 Jun 2007
Supported OS: Windows Vista, Windows Vista 64-bit
Driver name: Color LaserJet 2700 PCL6 Print Driver Only Package
Driver version: 60.063.461.42
Release date: 07 Jun 2007
Supported OS: Windows Vista, Windows Vista 64-bit
Driver name: PCL6MONO Print Driver Only Package
Driver version: 60.063.461.42
Release date: 07 Jun 2007
Supported OS: Windows Vista 64-bit
Driver name: PCL6MONO Plug and Play Package
Driver version: 60.063.461.42
Release date: 07 Jun 2007
Supported OS: Windows Vista 64-bit
Driver name: PCL6 Print Driver Only Package
Driver version: 60.063.461.42
Release date: 07 Jun 2007
Supported OS: Windows Vista 64-bit
Driver name: Plug and Play Package
Driver version: 60.063.461.42
Release date: 07 Jun 2007
Supported OS: Windows Vista 64-bit
Update your drivers!
Check for drivers updates automatically and fix drivers problems in Windows 10, 8, 7, Vista, XP and other OS.
Инструкция по заправке картриджа HP Color LJ CP3505 / 3600 / 3800 Q6470A Q6471A Q6472A Q6473A 501a / CANON 711 / LBP-5300 / 5360 / MF-9130 / 9170 9280

Относительно совместимый тонер:
HP 3000/3600/3800/
4005/4600/4700/5500 (1025/1215)
Масса тонера:
Работу не блокирует.
Замена или отключение через меню для HP CLJ 1600/2600/2605 («Игнор. вывод»)
Необходимые инструменты:
Пылесос для тонера
Маленькая плоская отвертка
Крестообразная отвертка
Канцелярский нож (скальпель)
Кусачки
Дрель (паяльник с тонким жалом)
Молоток
Шило
Необходимые принадлежности:
Присыпка фотобарабана (тальк)
Одноразовая тряпчастая салфетка (ватный диск)
Токопроводящая смазка
Изопропиловый спирт
Ватные палочки
Совместимость ЗИП
Тонер совместимый с серией HP CLJ 3000/3600/3800/4005/4600/4700/5500 (1025/12185)
Фотобарабан – HP Color LaserJet 3600 / 3800dn / CP3505
Вал первичного заряда – HP Color LaserJet CP1215/ 1515/ CM1415/ CLJ 2600/ 3505/ 3800 / CB540A / CE250A / Q6000A / Q6470A
Чистящее лезвие – HP Color LaserJet 2700 / 3000 / 3600 / 3800 / CP3505 / Q7560A / Q6470A / Q7581A / Canon C1022/C1030 MFP / LBP-5300 / LBP-5360 / MF8450/ MF9130 / MF9170 / MF9220 / MF9280 Canon 717 / Canon 711 / Canon GPR-28
Вал переноса – HP Color LaserJet 2700 / 3000 / 3500 / 3550 / 3600 / 3700 / 3800 / CP3505 Canon LBP-5300 / 5360 / MF8450c / MF9130 / MF9170 / MF9220 / MF9280
Дозирующее лезвие – HP Color LaserJet 2700 / 3000 / 3600 / 3800 / CP3505 / Q7560A / Q6470A / Q7581A / Canon C1022/C1030 MFP / LBP-5300 / LBP-5360 / MF8450/ MF9130 / MF9170 / MF9220 / MF9280 Canon 717 / Canon 711 / Canon GPR-28
Острым ножом или скальпелём срезаем пластиковые заглушки поверх штифтов на торцах.
Высверливаем возле штифта место для зацепки в пластике. (для этого можно использовать паяльник с очень тонким жалом) Затем зацепляем штифты чем-нибудь острым и вынимаем их.
Теперь снимаем две пружины снизу по краям и разъединяем картридж на две половинки.
Берем верхнюю часть картриджа и снимаем крышку слева. Она держится на трех защелках.
Снимаем две шестерни, металлическую пластину и еще три шестерни под ней.
Там же есть два винта, откручиваем их и снимаем крепление целиком.
Теперь снимаем крепление справа открутив два винта.
Снимаем вал переноса и чистим его от тонера и грязи ватным диском смоченным в изопропиловом спирте.
Откручиваем два винта и снимаем дозирующее лезвие. Аккуратно чистим его от тонера и осматриваем его на наличие дефектов.
Вычищаем остатки старого тонера и засыпаем новый. Никогда не досыпайте новый тонер к старому, это обойдется себе дороже. Затем собираем все в обратном порядке и переходим к другой половине.
С одной из сторон выбиваем штифт и удаляем его при помощи кусачек.
Затем выбиваем ось вправо и снимаем фотобарабан.
Отщелкиваем крепление и снимаем вал первичного заряда. Тщательно чистим его от остатков тонера и грязи при помощи ватного диска смоченного в изопропиловом спирте.
Откручиваем два винта и снимаем лезвие очистки.
Вычищаем отработанный тонер и собираем все в обратном порядке. Соединяем обе половины и скрепляем их штифтами и пружинами.
Меняем чип (Чип менять не обязательно, роботу устройства не блокирует).
Ремонт HP Color LaserJet 3600n
В ремонт поступил принтер HP Color LaserJet 3600n, который выдавал ошибку 10.92.00. Эта ошибка означает неисправность правого замка картриджей, который поднимает шторки всех 4 картриджей.
Разборка HP Color LaserJet 3600n
Снимаем ленту переноса. Она крепится на защелках справа и слева.
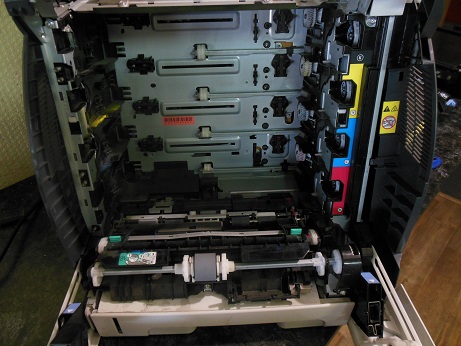
Снимаем печку. Она тоже на защелках.
Снимаем верхнюю крышку, открутив винты крепления.
Справа располагается замок картриджей.
Ремонт правого замка
При осмотре было обнаружено, что была сломан ограничитель направляющей правого замка.
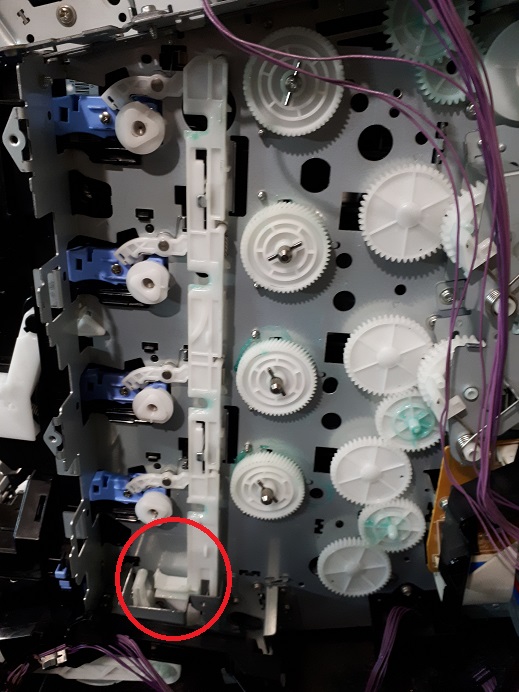
В результате рычаг передней крышки выскакивает из направляющей и не управляет ей.
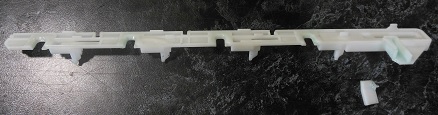
Замок служит для поднятия шторок картриджей при закрывании передней крышки, их фиксации и должен выглядеть так
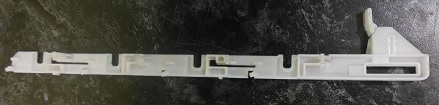
Из-за поломки рычага толкатель крышки выходит из зацепления и не поднимает замок.
Замена замка весьма сложное дело. Без опыта лучше не пробовать, т.к. для замены нужно снимать блок шестеренок, управляющий вращением фотовалов. Все шестерни должны быть синхронизированы, иначе будет расхождение наложения цветов.
Цена ремонта правого замка картриджей HP Color LaserJet 3600 составляет 3500 руб.
Поломка левого замка картриджей
Вместе с поломкой правого замка картриджей нередко ломают и левый замок. Если левый замок сломался, то ошибка не исчезнет. Потому что картриджи не войдут в рабочее положение из-за перекоса.

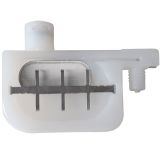
В нашем конкретном случае сломали рычаг прижима черного картриджа. Он мешал установке черного картриджа. Ремонт стоит 3000 рублей.
Полезные статьи от ITComplex
Инструкция по заправке HP Color LaserJet 2700, 3000, 3600n, 3600dn, 3800n, 3800dn, CP3505n, CP3505dn
Мануал по заправке картриджа hp color laserjet 3600n, 3600dn, 3800n, 3800dn, cp3505n, cp3505dn, как заправить картридж q6470a, q6471a, q6472a, q6473a
Предлагаем Вам информацию о заправке HP CLJ 2700, 3000, 3600 n, 3600 dn, 3800 n, 3800 dn, CP3505 n, CP3505 dn, мануал для самостоятельной заправки Q6470A, Q6471A, Q6472A, Q6473A принтера HP
Эта Мануал актуальная для следующих принтеров:
- Color LaserJet-3505 / 3800
- LaserJet-3505 / 3600 / 3800
- LaserJet-2700 / 3000
- Color LaserJet-3600
Инструкции по заправке лазерных картриджей:
Для заправки вам понадобится:
— совместимый тонер;
— плоская отвертка;
— остроконечные щипцы (пинцет).
Начните с удаления запаянных остатков вокруг шпильки с шестереночной стороны картриджа.
Повторите ту же процедуру на стороне без шестеренок.
Просверлите небольшое отверстие над шпилькой на обеих сторонах картриджа.
Вставьте разметчик или выталкиватель шпильки через отверстие, чтобы вытолкнуть шпильку наружу с одной стороны.
Извлеките шпильку при помощи маленьких плоскогубцев. Эта шпилька короткая и подходит только к этой стороне.
Повторите ту же процедуру с противоположной стороны. Эта шпилька также проходит через центр главной ведущей шестеренки во время извлечения.
Запомните размеры шпилек для контактной стороны (короткая) и для стороны шестеренок (длинная).
При помощи инструмента с загнутым краем освободите пружину из барабана со стороны шестеренки.
Освободите пружину со стороны без шестеренок.
Отделите отсек для тонера от барабана.
Начнем с удаления пластины со стороны шестеренки. Конец пластины крепится тремя защелкивающимися изнутри петлями.
Найдите первую петлю на верху пластины. Используя инструмент с загибом, нажмите на петлю.
Найдите вторую петлю и повторите ту же самую процедуру.
С третьей петлей сделайте то же самое.
Снимите шестеренки с проявителя, как показано.
Используя инструмент с загибом, выдвиньте пластину. Покажутся три шестеренки расположенные ниже.
Оставшиеся шестеренки удалены. Показана пластина поддерживающая шестеренку.
Открутите два болта с пластины.
Выдвиньте опору шестеренки, как показано.
На противоположной стороне отсека открутите два болта с пластины.
Теперь вы можете снять ролик проявителя.
Для начала открутите два болта крепящих дозирующее лезвие.
При помощи маленькой плоской отвертки подденьте лезвие, чтобы отделить его от ОЕМ клея.
Внимание: Приподнимайте только с одной стороны.
Как только вы отделили лезвие достаточно далеко от отсека, продолжайте полностью вытаскивать его, используя вашу руку.
Показан отсек:
а) Тщательно очистите отсек при помощи сжатого воздуха.
б) Заполните отсек новым тонером через показанное отверстие.
в) Очистите и установите дозирующее лезвие, чтобы уплотнить тонер.
г) Соберите остальную часть отсека, последовательно, в обратном порядке и отложите его в сторону.
При помощи молотка и стамески выбейте шпильку с другой стороны барабана.
Поверните фото барабан так, чтобы шпилька была видна и доступна для захвата среднего размера плоскогубцами. Вытащите шпильку.
С противоположной стороны барабана стучите по оси барабана внутрь при помощи стамески и барабана, пока ось не выйдет наружу.
Снимите фото барабан, как показано.
Освободите ручку ВПЗ, приподняв ее вверх.
После освобождения обеих ручек, снимите ВПЗ.
При помощи резца аккуратно приподнимите и удерживайте контактную полосу фото барабана, чтобы открутить болт под ней крепящий ракель. Повторите ту же процедуру с противоположного конца лезвия.
Поместите резец или небольшую отвертку между основой ракеля и отсеком снизу, где крепится.
Подденьте ракель и освободите его от клейкого уплотнения.
Теперь медленно, но верно потяните за освободившийся конец ракеля вверх рукой, как показано, пока он полностью не выйдет.
Найдите чип возле задней верхушки картриджа.
Закройте ОЕМ чип.
Используя маленький скальпель, аккуратно срежьте запаянные пластиковые петли крепящие чип.
При помощи кончика скальпеля приподнимайте чип вверх из слота, пока он полностью не выйдет.
ОЕМ чип извлечен.
Нанесите немного пластикового раствора в слоты. Это укрепит замененный чип на месте с каждой стороны.
Внимание: Не наносите слишком много раствора, т.к. он может закрыть контакты чипа, что сделает чип бесполезным.
Вставьте замененный чип так, как показано (золотой пластиной наружу, тремя отверстиями вниз). Чип не будет читаться, если перевернут или вставлен неправильно.
Чип установлен. Дайте раствору высохнуть перед тестированием картриджа.
HP Color LaserJet 3000 3600 3800 CP3505 Printer English Service Manual
Unit Price : $ 2.18 /pc ( Discount Notice)
Quantity: pc(s) Total Cost: USD $ 2.18
- US Dollar
- Pound Sterling
- Canadian Dollar
- Euro
- Brazilian Real
- Russian Ruble


 item added to cart
0 total in your Cart, Cart Total: $

- Q&A
- Membership Point
- Report Error
- Price Match
- Can’t find what you are looking for
- Add To WishList
- Overview
- Reviews
- Transaction History
- 1. If you choose to ship by Express, you can see the shipping fee is a little High, but it can deliver to your door within 3-5 days, you need only to make the payment and wait.
- 2.If you choose to ship by sea, the shipping fee is lower, and you need to go to the ports to make the clearance at the Customs, and take the good from the port to your home by yourself.Generally it takes from10 to 30 days, depending on the consignee address.
- 1.Paypal (online payment)
- 2.Creidit card
- 3.Bank Transfer (T/T)
- 4.Western Union online/offline payment
- Buyer
- Unit Price
- Quantity
- Order Date

- $2.18
- 1 pc
- 2014-05-27
- BANK NAME:HONGKONG AND SHANGHAI BANKING CORPORATION LIMITED
- BANK ADDRESS:ROOM 2105, BJ1038, TREND CENTRE, 29-31 CHEUNG LEE STREET, CHAI WAN, HONG KONG.
- BANK SWIFT CODE: HSBCHKHHHKH
- BENEFICIARY NAME: CHINASIGNS INFORMATION (HONGKONG) CO.,LTD
- ACCOUNT NUMBER: 801165036838
- BANK NAME:HONGKONG AND SHANGHAI BANKING CORPORATION LIMITED
- BANK ADDRESS:ROOM 2105, BJ1038, TREND CENTRE, 29-31 CHEUNG LEE STREET, CHAI WAN, HONG KONG.
- BANK SWIFT CODE: HSBCHKHHHKH
- BENEFICIARY NAME: CHINASIGNS INFORMATION (HONGKONG) CO.,LTD
- ACCOUNT NUMBER: 801165036838


seller assumes all responsibility for this listing
Shipping and handling

| Handling time |
| Will usually ship within 3 business days of receiving cleared payment. |
Ship from where?
 | We have 4 overseas warehouses all over the world now including: Russia, USA, Brazil and Mexico. and We are setting up another one in Europe. Normally, we will ship your order from the nearest warehouse to you. if the stock near you is sold out, we will ship your order to you directly from china. |
Return policy
 | Purchases can be returned under the following conditions: 1) There are quality problems after opening the package. 2) Products are different than on the order list. 3) Products are irreparably damaged during transportation. |
Payment details
| Payment method |
 | Transaction History Title: HP Color LaserJet 3000 3600 3800 CP3505 Printer English Service Manual Notice: 1. FREE Shipping & Handling cost 2. We will ship the PDF file through your paypal email within 1-12 hours. 3. If you can’t find the document that you need, please just click “Ask a Question” Button above to leave us a message.
Learn more about us from the following links: 2. Not clear about the Price Policy of Sign-in-China.com? a) The Stepped Price b) Trial Order Price / Sample Price c) Limited Time Offers d) Flash Wholesale e) You decide the prices for Bulk Orders 3. How to pay? Can I use credit card? b) PayPal direct payment (our PayPal account: lyh@chinasigns.cn) e) Telegraphic Transfer (T/T) payment Bank transfer payment information:
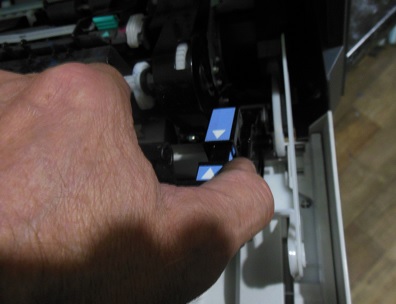
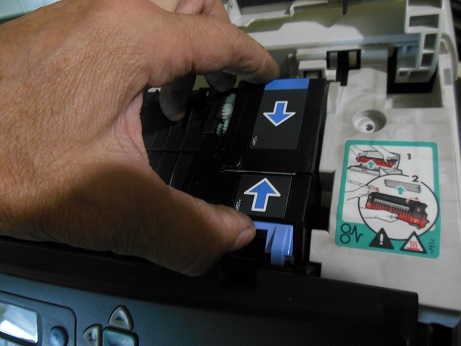
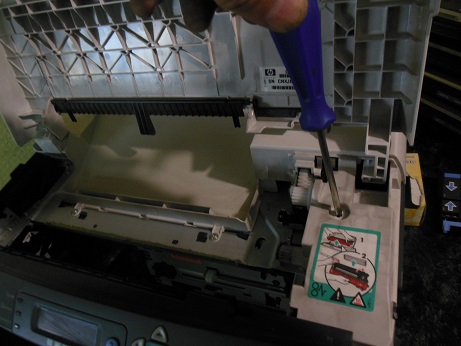
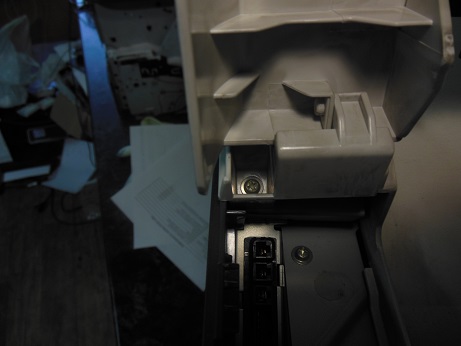
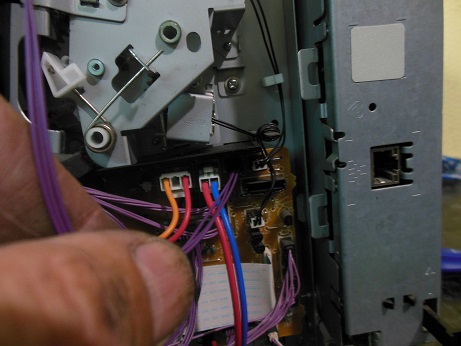
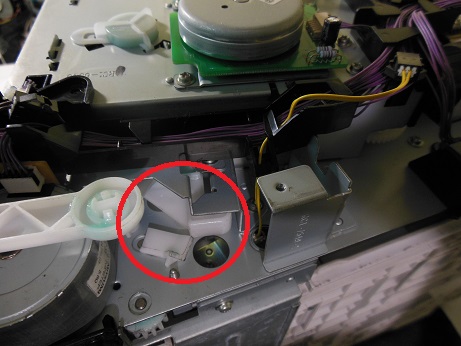
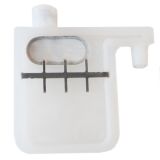
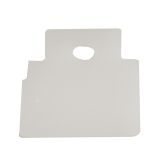
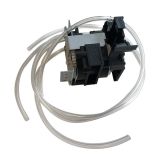
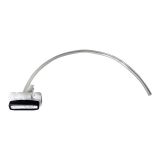
Learn more about us from the following links: 2. How to calculate shipping cost. For details, please refer to the following: a) Bank Transfer (T/T) payment (1) Place an order (2) Get the bank account information of Sign-in-China.com (3) Make the payment at the bank, and get the Payment Receipt (4) Send the Payment Receipt to service@sign-in-china.com (5) Receive the Tracking Number of your order (6) Wait for your order. Bank transfer payment information: f) Western Union Payment Receiver’s First name: Zifei Receiver’s Last name: Li Address: 4th Floor., Building No.8, Community No.12. Advanced Business Park, No.188 Western Road of the 4th Ring, Fengtai, Beijing. If you failed to make payment via PayPal, please choose Bank Transfer(T/T) or Western Union Payment. 6. How can I know if it is paid successfully? We will ship your order by Express or by sea and usually the carriers are FedEx, TNT, UPS, DHL, or EMS. It shall be quite safe during shipping with substantial package. It shall be quite safe during shipping with substantial package. Additionally, we will purchase insurance as a gift for your package. 11. How to obtain the tracking number of shipment? And how to contact the carrier (express delivery company)? For details, please click the following links: 13. If I still have questions to this product, what shall I do? please click CLJ CP3505-3800-3600-3000 MDA Install Instructions.pdflarge gearssmall gearsmain drive assemblyservice manualwhite shaftsright coverwhite camsmetal shaftsText of CLJ CP3505-3800-3600-3000 MDA Install Instructions.pdfPart Number RM1-2751-000CN – Main Drive Assembly Replacement and Timing Procedure HP CLJ CP3505/3800/3600/3000 Removal 1. Remove the print cartridges and the ETB. 2. Remove the Upper Cover (see page 80 in the service manual). 3. Remove the Right Cover (see page 87 in the service manual). 4. Note: For duplex models, you might need to remove the wires to the duplex fan in the front cover. Simply follow instruction 5 on page 77 in the service manual. This allows for easier removal of the cable harnesses. 5. Unplug the following connectors from the Driver PCA and remove the wires from the cable harnesses: a. J209 b. J406 c. J404 d. J213 e. J207 f. J203 g. J402 h. J206 6. Remove the Interlock switch assembly by removing the 1 screw. When removing the assembly, be aware of the clip at the top and the alignment knob. 7. Remove the bottom cable harness. There is one screw at the top to remove. Hint: When you reinstall the guide, make sure that the rear locking tab is seated in the sheet-metal chassis. (See page 121 in the service manual.) You might need to disconnect the white door latch from the front door. (Notice the red arrow callout.) 8. Remove the Main Drive Assembly (MDA). Carefully note the locations of the six screws to remove. CAUTION: Removing the incorrect screws could lead to opening up the MDA, which could require a unit replacement! Note: Two gears might fall off; see step 9 for instructions to align them during the re-installation process. Installation and Timing 9. Make sure the gears are aligned correctly before installing the Main Drive Assembly. The four large gears should be in an approximate line (see the picture to the left). The top two large gears have an oval hole that aligns with a triangle stamped into the sheet metal. The two small gears to the right (they may fall off when removing the MDA), align with the three large bottom gears. You can see the two holes on each of the small gears align with the small holes of the large gears. Note: To make sure the gears are aligned correctly, look inside the printer. You will see the four white cams that control the movement of the developers. (See the figure below.) These white cams should all be at different degrees of rotation. This reduces the force required to drive the motors when turning the cams. On the top and bottom shafts, you can see a black plastic part that has a flag associated with it. (See red arrows below.) The top flag is for the black cartridge, the bottom flag is for all the color cartridges. The flags should be rotated so they point straight back into the sensor. Metal shafts should be oriented with the empty space downwards 10. To prepare the MDA for installation, check the following two items: NOTE: It is important that the ETB guides are in the up position to make installation of the MDA go smoothly. a. Make sure that all the white shafts are pushed as far to the right (clock-wise) when the MDA is oriented as below. (See the blue arrows in the image below.) The shafts are aligned correctly in the picture. Hint: Rotate the shaft all the way to the right side first (as far as possible) then push them back a little to the left; they will come to a hard stop. Leave them there. Look at the line marks on the metal frame of the MDA (yellow arrows). b. Next, pay attention to the area marked with the two red arrows, enlarged in the picture below. It is possible that during the handling of the MDA, one or both of these two gears can be mis-positioned by accident. If this happens, one or more of the color planes could be missed during printing. The gear on the right controls the black cartridge; it drives the larger gears to right below it to the right. The gear on the left controls all three of the color cartridges; it drives all the remaining three larger gears, the one directly below it and the two to the left. (Indicated by the dotted oval in the picture above.) Check if they are properly aligned as follows: Both gears can be rotated either way to properly correct the MDA gears alignment. The images above show how to verify if the gears are correctly aligned. The two holes from larger gears should both be showing as illustrated by the red circles. (The large gears are under the frame and driven by the smaller gears.) 11. With the above items aligned, install the Main Drive Assembly. Start at the left side, inserting the MDA into the metal slots and rotate it into position. You might need to place a screw in the upper-right corner of the MDA to help keep it in place if the MDA doesnt fit flush when first installing it. This gives you access with both hands to jiggle it into place. 12. Make sure the clips are pushed in and the MDA is seated correctly: 13. At this point, reassemble the printer by reversing steps 7 through 1. Remember to correctly thread the cables through the wire harnesses. Note: the connector to the top cover is different between the simplex and duplex models. The duplex model has a larger connector, while the simplex is much smaller. Troubleshooting Following are troubleshooting steps to follow if you encounter any of the following issues after installing the new main drive assembly. Main Drive Assembly (MDA) rework possible side-effects Possible Failures After Rework Troubleshooting 13.01.00/13.02.00 Check connection 1 (see #1 in Figure 1 below) “Close Top Cover/ Close Front Door” Check connection 4 (see #4 in Figure 1 below) Check connection 3 (see #3 in Figure 1 below) “Insert or Close Tray 2” Check connection 2 (see #2 in Figure 1 below) 10.92.XX Noise From Main Drive PQ-defect (i.e.: wrong color, Missing color pane, process CPR) Check the cartridge bottom lock (see #5 in Figure 2 below) Remove the MDA and check alignment of all the gears. Correct as instructed. (For details, see steps 9 and 10 above and re-check the MDA alignment as shown in Figure 3 below) For noise specifically, check to see that the Cartridge Drum Sensors are correctly seated on the MDA (see Figure 4 below) There are 4 of these (one per drum) on the MDA. 59.C0 Error One of the two drive gears on the engine is NOT correctly inserted. Remove MDA and re-align gears as instructed (see steps 9 and 10 above) Figure 1: Troubleshooting connection checkpoints Figure 2: Troubleshooting lock position Figure 3: Troubleshooting gear alignment Figure 4: Troubleshooting cartridge drum sensor 2010 Hewlett-Packard Development Company, L.P. /ColorImageDict > /JPEG2000ColorACSImageDict > /JPEG2000ColorImageDict > /AntiAliasGrayImages false /CropGrayImages true /GrayImageMinResolution 150 /GrayImageMinResolutionPolicy /Warning /DownsampleGrayImages true /GrayImageDownsampleType /Bicubic /GrayImageResolution 300 /GrayImageDepth -1 /GrayImageMinDownsampleDepth 2 /GrayImageDownsampleThreshold 1.50000 /EncodeGrayImages true /GrayImageFilter /DCTEncode /AutoFilterGrayImages true /GrayImageAutoFilterStrategy /JPEG /GrayACSImageDict > /GrayImageDict > /JPEG2000GrayACSImageDict > /JPEG2000GrayImageDict > /AntiAliasMonoImages false /CropMonoImages true /MonoImageMinResolution 550 /MonoImageMinResolutionPolicy /Warning /DownsampleMonoImages true /MonoImageDownsampleType /Bicubic /MonoImageResolution 2400 /MonoImageDepth -1 /MonoImageDownsampleThreshold 1.50000 /EncodeMonoImages true /MonoImageFilter /CCITTFaxEncode /MonoImageDict > /AllowPSXObjects false /CheckCompliance [ /PDFX1a:2001 ] /PDFX1aCheck false /PDFX3Check false /PDFXCompliantPDFOnly false /PDFXNoTrimBoxError false /PDFXTrimBoxToMediaBoxOffset [ 0.00000 0.00000 0.00000 0.00000 ] /PDFXSetBleedBoxToMediaBox false /PDFXBleedBoxToTrimBoxOffset [ 0.00000 0.00000 0.00000 0.00000 ] /PDFXOutputIntentProfile (GWG_GenericCMYK) /PDFXOutputConditionIdentifier () /PDFXOutputCondition () /PDFXRegistryName () /PDFXTrapped /False /CreateJDFFile false /Description > /Namespace [ (Adobe) (Common) (1.0) ] /OtherNamespaces [ > /FormElements false /GenerateStructure false /IncludeBookmarks false /IncludeHyperlinks false /IncludeInteractive false /IncludeLayers false /IncludeProfiles false /MultimediaHandling /UseObjectSettings /Namespace [ (Adobe) (CreativeSuite) (2.0) ] /PDFXOutputIntentProfileSelector /DocumentCMYK /PreserveEditing true /UntaggedCMYKHandling /LeaveUntagged /UntaggedRGBHandling /UseDocumentProfile /UseDocumentBleed false >> ]>> setdistillerparams> setpagedevice |


 on the product page and submit your questions, we will reply you as soon as possible.